Efficient Drip Lines for Garden Beds
Setting up tailored watering for vegetables in raised beds can greatly reduce labor and help ensure lush, healthy growth. Many gardeners seek both ease and reliability, especially in climates where rainfall doesn’t always meet plant needs. Careful pipe layout, quality parts, and simple troubleshooting measures all contribute to a thriving harvest. Preparing properly not only saves time, it conserves water and promotes steady results.
Careful pipe setup is the secret to regular hydration for every plant in a raised bed plot. Technology makes it possible to deliver water directly to crops’ root zones, avoiding excess moisture on leaves and wasted runoff. Gardeners often find drip lines increase yields and even improve vegetable flavor. For these reasons, growers choose this method for precision watering and ease of maintenance.
Fact: Drip irrigation can use up to 60% less water than overhead sprinklers, targeting only the root zones and resulting in higher efficiency.
Key Steps for Laying Lines
Before starting, sketch a simple map of beds and decide how many runs will be placed per garden box. Straighten the plastic tubing by leaving it in the sun for an hour; this will make working with the lines much easier. It’s better to handle the materials when they are flexible and less likely to kink.
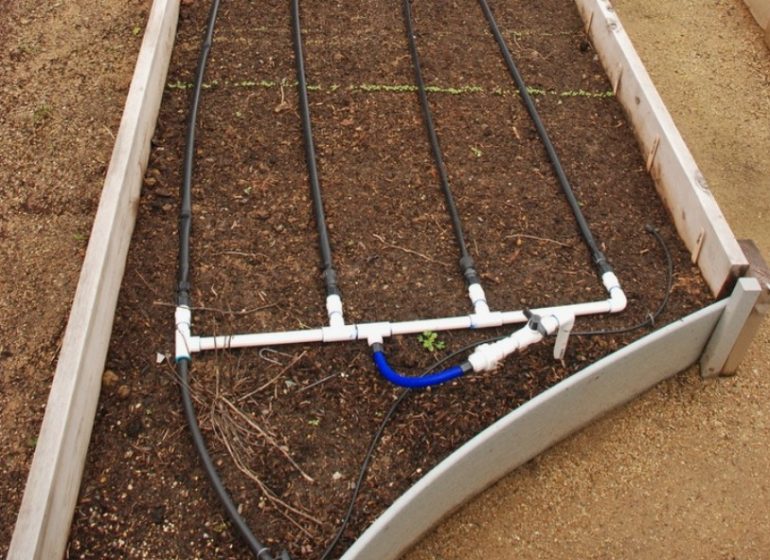
- Attach a Y-connector to the water spigot to allow for other hoses if needed
- Connect a timer and pressure regulator for steady flow
- Cut tubing neatly and use elbow or T-fittings at bed corners for turns
- Lay lines evenly spaced, covering the entire soil surface
- Secure lines with stakes so the setup remains in place through seasons
When connecting drip tubing to the water source, use a barbed adapter and firmly twist the tubing until it locks. For each row, punch a hole using a dedicated tool, then insert a coupler and connect the prepared drip line. Stretch the drip line down the row of the bed and terminate the end with a goof plug. Repeat for all rows until coverage is complete.
Fact: Properly installed drip lines in raised beds can help cut weed growth, since water is delivered precisely at the roots rather than to the entire soil surface.
Best Techniques for Maintenance and Extension
After positioning and securing the lines, check the system for leaks and blockages. Running water through the network before planting ensures all emitters produce a steady flow. In larger beds, adding a secondary header line can help distribute water more uniformly. Mulch placed over the lines helps preserve soil moisture and shields the components from sun damage.
Maintaining a flexible approach allows for expansion if more beds are added in future seasons. Consider using removable connectors and modular fittings for simple system upgrades or repairs. Pay attention to pressure levels—changing the regulator may be needed for longer or multi-level setups to keep water balanced throughout the network. Testing every few weeks makes it easier to spot issues before they affect growth.
Custom pipe and emitter placement provide an adaptable foundation for a variety of vegetable types and garden configurations. Connecting Drip Lines thoughtfully in raised beds results in consistent moisture, improved plant health, and decreased manual labor. For hobbyists and serious gardeners alike, this approach bridges convenience and effective crop care.