Removing the Internal Water Unit from Jenn Air Fridge
Getting Ready for the Process
Before beginning, it makes sense to fully empty the fridge section and disconnect the appliance from the power supply. Safety is always a priority when dealing with any electrical device. Lay a towel underneath the fridge to catch any water residue during the work. Preparation allows everything to go smoothly and minimizes the chance of complications. If tools and replacement parts are needed, gather them in advance for convenience.
Basic Preparation Steps
- Power off the refrigerator and unplug it from the wall.
- Remove items from shelves near the dispenser area for easiness.
- Consider shutting off your water supply to avoid leaks.
- Keep tools such as screwdrivers, pliers, and a towel nearby.
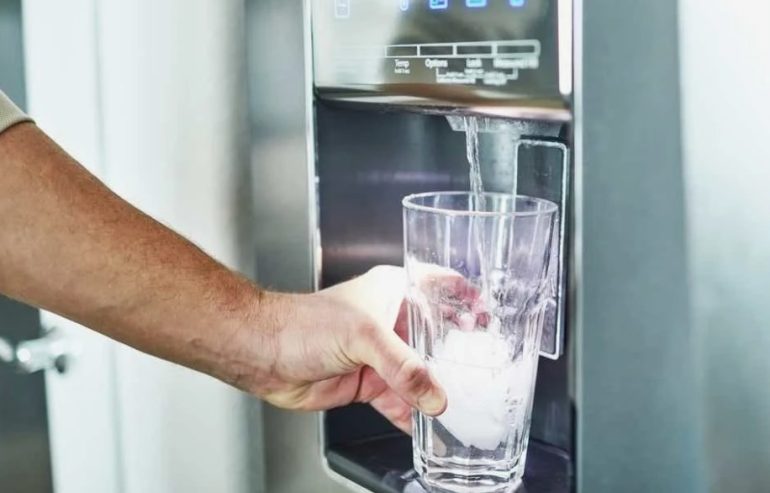
Today, the majority of Jenn Air refrigerator models have internal dispensers designed for easy access and cleaning. Many people find that removing them provides more shelf space or helps solve leaks.
Dismantling the Door Panel
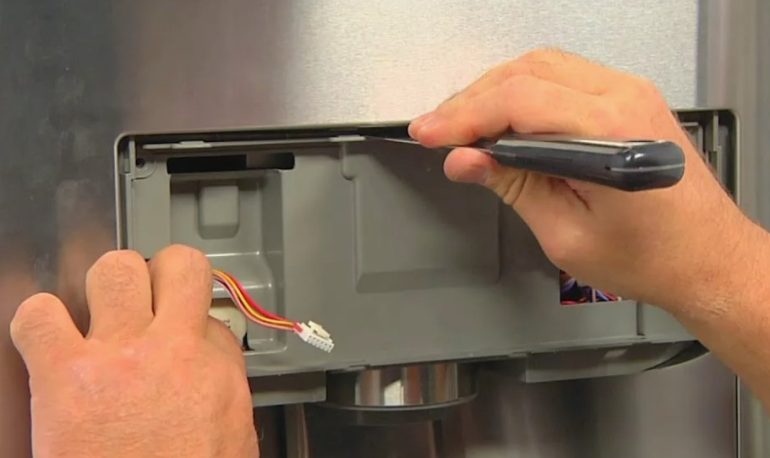
The next step involves careful removal of the fridge door panel to access the water unit inside. Locate the screws around the panel’s perimeter and unscrew each one, keeping them in a safe place. Gently detach the panel, watching for any connected wires or components. Once visible, the control section may need to be loosened, making sure not to pinch or damage the wiring. Some models will require sliding or snapping off sections rather than simply pulling.
Door Panel Handling Tips
Take your time removing the panel, especially if it feels stuck. Check that all screws are removed before attempting to lift the panel away. Labeling any disconnected wires helps later during reassembly, ensuring each connection returns to its original spot.
Interesting fact: Sometimes, factory tape or stickers secure internal wires near the dispenser. Removing them carefully increases the chance of a neat and tidy result.
Accessing and Removing the Water Dispenser Mechanism
Once the internal section is exposed, look for the dispenser housing. This part is typically held in place by several hex head screws. Use an appropriate screwdriver and gently unscrew them. Pull the housing forward to reveal the attached wires, taking note of their routes. Next, remove the pads and water spigot by disengaging clips or fasteners, often by pressing in and sliding upward. Be mindful of the small plastic catches which keep the pads in place.
Guidelines for Removing the Mechanism
It’s recommended to detach each wire with gentle pressure, avoiding any pulling that could cause breakage. Untape or unclip connections as necessary. The housing might come loose easily, but confirm all screws and wires are free before extracting.
- Take photos throughout disassembly for better reference.
- Store disconnected parts and screws separately to prevent loss.
- Check for any water residue and clean it up before proceeding.
If the dispenser mechanism seems fixed, check for hidden screws or clips inside the housing. Rushing could damage the unit, so patience pays off.
Final Steps and Reassembly Advice
After removing the dispenser, take the time to wipe down the area, removing traces of water and dust. Double-check that all wires are out of the way so they won’t get pinched when the panel goes back on. When ready, begin reassembling the door panel and control unit in reverse order. Reattach every wire to its original plug and be careful as you align screws and connectors, using photos for guidance if needed.
Reassembly Reminders
If during reassembly, something refuses to fit, review photos or diagrams for correctness. Don’t force any pieces, and keep in mind every step can be repeated or adjusted. Once everything is back in place, plug in the refrigerator and turn on the water supply to check for leaks or other issues.
Removing this appliance mechanism is a practical way to refresh an aging refrigerator or address persistent technical concerns.
Extra Tips for Long-Term Care
Keeping the refrigerator clean after removing the water dispenser improves hygiene and extends the life of the appliance. Consider periodically checking internal wires and panels for any signs of moisture or wear. For future maintenance, storing all removed parts and screws in labeled bags helps greatly. Some users find that adjusting shelf height after removal increases storage capability and convenience for daily use.
- Inspect connections occasionally for damage or corrosion.
- Keep a record of any changes or repairs performed.
- Update family members about the new configuration to avoid confusion.